- The Hacker News: The Hacker News — most trusted and widely-acknowledged online cyber security news magazine with in-depth technical coverage for cybersecurity.
- SecTools.Org: List of 75 security tools based on a 2003 vote by hackers.
- Phrack Magazine: Digital hacking magazine.
- KitPloit: Leading source of Security Tools, Hacking Tools, CyberSecurity and Network Security.
- Exploit DB: An archive of exploits and vulnerable software by Offensive Security. The site collects exploits from submissions and mailing lists and concentrates them in a single database.
- HackRead: HackRead is a News Platform that centers on InfoSec, Cyber Crime, Privacy, Surveillance, and Hacking News with full-scale reviews on Social Media Platforms.
- Hakin9: E-magazine offering in-depth looks at both attack and defense techniques and concentrates on difficult technical issues.
- Metasploit: Find security issues, verify vulnerability mitigations & manage security assessments with Metasploit. Get the worlds best penetration testing software now.
- Hacked Gadgets: A resource for DIY project documentation as well as general gadget and technology news.
- Packet Storm: Information Security Services, News, Files, Tools, Exploits, Advisories and Whitepapers.
Tuesday 30 June 2020
Ethical hacking : Top 10 best websites to learn hacking
Thursday 11 June 2020
FOOTPRITING AND INFORMATION GATHERING USED IN HACKING
Footpriting is the technique used for gathering information about computer systems and the entities they belongs too.
To get this information, a hacker might use various tools and technologies.
Basically it is the first step where hacker gather as much information as possible to find the way for cracking the whole system or target or atleast decide what types of attacks will be more suitable for the target.
Footpriting can be both passive and active.
Reviewing a company's website is an example of passive footprinting,
whereas attempting to gain access to sensititve information through social engineering is an example of active information gathering.
During this phase hacking, a hacker can collect the following information>- Domain name
-IP Addresses
-Namespaces
-Employee information
-Phone numbers
-E-mails
Job information
Tip-You can use http://www.whois.com/ website to get detailed information about a domain name information including its owner,its registrar, date of registration, expiry, name servers owner's contact information etc.
Use of Footprinting & Information Gathering in People Searching-
Now a days its very easy to find anyone with his/her full name in social media sites like Facebook, Instragram,Twitter,Linkdedin to gather information about date of birth,birthplace, real photos, education detail, hobbies, relationship status etc.
There are several sites like PIPL,PeekYou, Transport Sites such as mptransport,uptransport etc and Job placement Sites such as Shine.com,Naukari.com , Monster.com etc which are very useful for hacker to collect information about anyone.
Hacker collect the information about you from your Resume which you uploaded on job placement site for seeking a job as well as hacker collect the information from your vehicle number also from transport sites to know about the owner of vehicle, adderess etc then after they make plan how to attack on victim to earn money after know about him/her from collecting information.
INFORMATION GATHERING-It is the process of collecting the information from different places about any individual company,organization, server, ip address or person.
Most of the hacker spend his time in this process.
Information gathering plays a vital role for both investigating and attacking purposes.This is one of the best way to collect victim data and find the vulnerability and loopholes to get unauthorized modifications,deletion and unauthorized access.
Related articles
Wednesday 10 June 2020
15 Hidden Android Features You Should Know
While Android has matured by leaps and bounds, it's still going through the refinement phase. Over time, Google has both added and removed many popular features in Android. Sometimes the features are completely removed. However, in many cases, they make it to the Settings page or they are buried under different hidden places inside Android. That's why we have come up with this article where we unearth 15 hidden Android features that are quite interesting and helpful. So, let's go ahead and explore some unique Android features which are available on our Android devices.
Hidden Android Features
Here, we have mentioned several hidden Android features ranging from privacy, security, ease of use and more. Further, we have also added some obscure Android features which were released recently but might have gone under the radar. Now with that said, here are the hidden Android features that you should know and use often.
1. Block Spam Calls
The one feature that I turn on whenever I set up a new Android device is: filter spam calls. It saves me from unwanted calls by telemarketers, fraudsters and spammers. If you use a stock Android device, you must have the Phone app by Google installed as your default dialer. To enable spam call blocking, open the Phone app and tap on the three-dot menu on the top-right corner and open Settings. After that, open "Caller ID and spam" and enable both the toggles. Now, whenever you will receive a call by spammers, the screen won't light up or make any sound. It's almost like DND with Total Silence turned on.
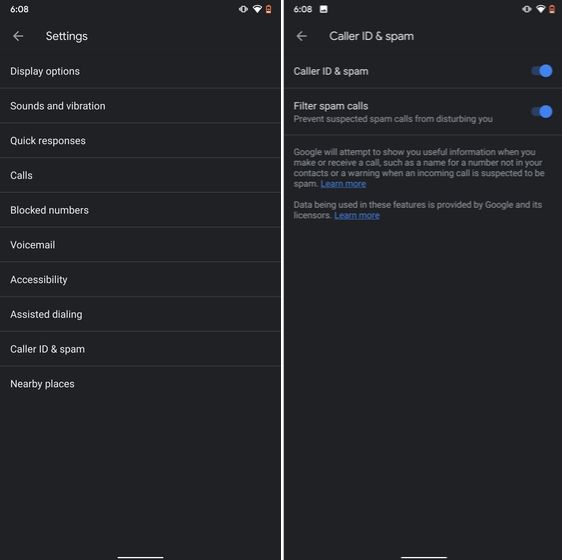
If you are worried that you will miss important calls then fret not. I have been using this feature for a long time and I can vouch that it works flawlessly. While there are other apps like Truecaller with similar features, you should be wary against handing your data to third-party apps, especially given its shady past record.
2. Verification Code Autofill
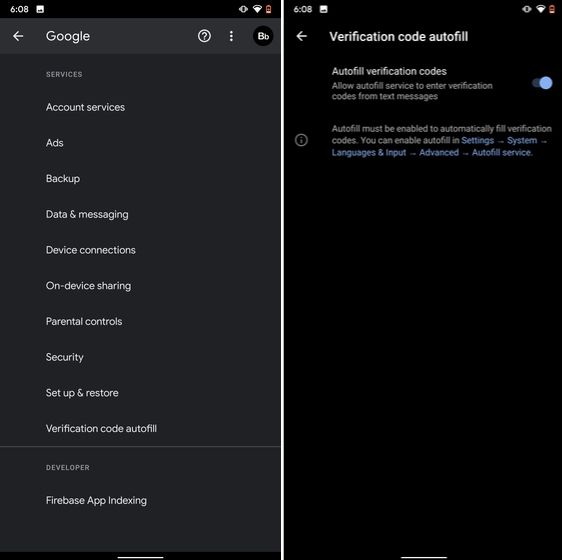
Many of us have allowed SMS permission to multiple apps for seamless OTP verification. However, this can lead to serious breach as apps can read all your text messages and also build credit profile without your consent. To crack down on this behavior, Google has brought a new API called the SMS Retriever. It allows apps to capture a one-time code without asking for SMS permission. In case, the app developer has not implemented this API, Google will act as a bridge and provide the verification code. That is awesome, right? So to enable this feature, navigate to Settings -> Google -> Verification Code Autofill and enable the toggle. Make sure you have also enabled the Autofill service by Google.
3. Force Dark Mode on all Apps
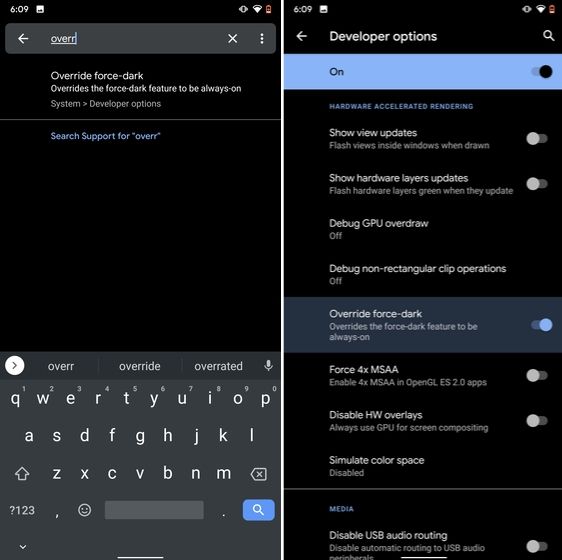
While the dark mode is slowly becoming the norm, there are still apps like Facebook and WhatsApp which are yet to embrace the dark side. If you want to force dark mode on a range of apps then there is a hidden Android setting that lets you do it. However, you must be on the latest Android 10 build. To enable dark mode for all the apps, navigate to Settings -> About Phone and tap on the Build Number for seven times continuously. A toast notification will show up prompting "Developer Options have been enabled". Now go back, and search for "Override force-dark" in the Settings page. Tap on the first result and then enable the toggle. Just to be sure, restart your device and check if dark mode is working on all apps.
4. Focus Mode
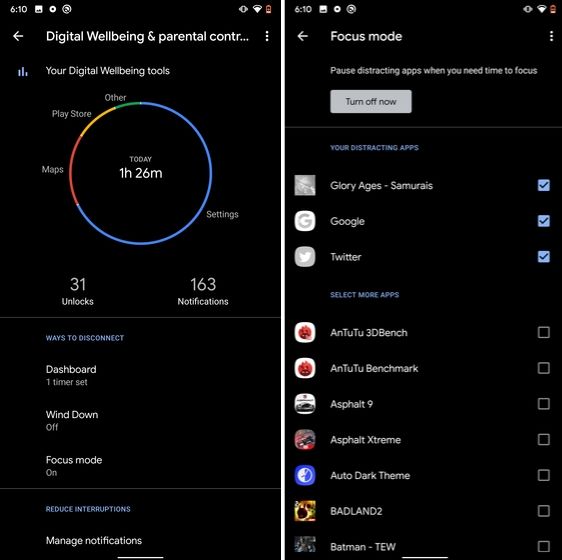
Google has brought a new feature called Focus Mode to Digital Wellbeing with the launch of Android 10. While Digital Wellbeing is great at limiting the screen time of various apps, Focus Mode allows you to block certain apps completely so you can focus on what you are doing. To configure Focus Mode, follow Settings -> Digital Wellbeing -> Focus Mode. Here, you can select apps that you find distracting and can enable Focus Mode straight from the Quick Settings panel.
5. Share WiFi with QR Code
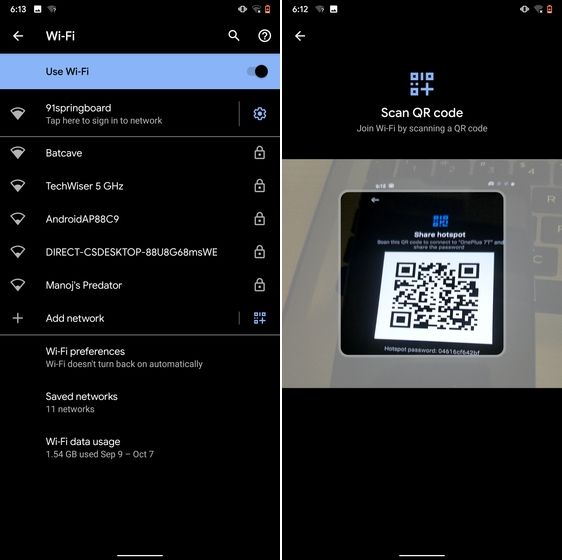
I know the feeling when someone asks you to share your WiFi's password and you can't seem to remember it. If you use a strong password with multiple hashes and characters then it becomes even more tedious to type it out. In such cases, a QR code can help you seamlessly connect to WiFi networks. Thankfully, Android 10 has this not-so-hidden feature under the WiFi Settings page. Open it and you will find the QR code scanner besides the "Add Network" section. Now, scan the QR code and you will be connected in no time.
6. Randomize MAC Address
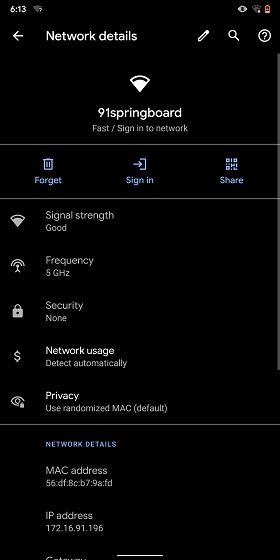
MAC address is a unique identifier assigned to WiFi-enabled devices including smartphones. Most devices come with a static MAC which can be exploited and used for tracking user movement. So having a random MAC address reduces the chance of tracking and strengthens your privacy. If you are running Android 10 then you can randomize the MAC address from the WiFi Settings page. Tap on the WiFi that you are connected to and open "Privacy". Here, make sure "Use randomized MAC" is your default pick.
7. Force Apps to Resize in Split Mode
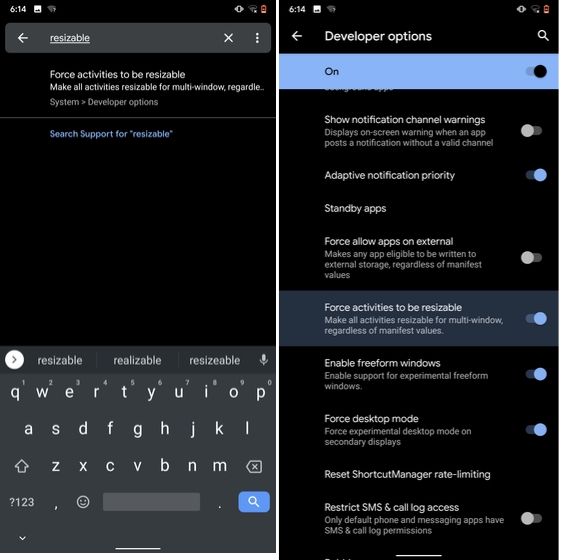
Android has some unique features like Split Mode which make it quite distinct from iOS. It lets you run two apps at once so you can effortlessly multitask between them. However, not all apps support Split Mode and that's where this hidden Android feature comes into play. With this feature, you can force any app to resize in split mode, irrespective of the app compatibility. So to enable this feature, open Settings and search for "resizable". Open the first result and enable "Force activities to be resizable". Now, restart your device and you can enjoy any app in the Split mode.
8. Default USB Configuration
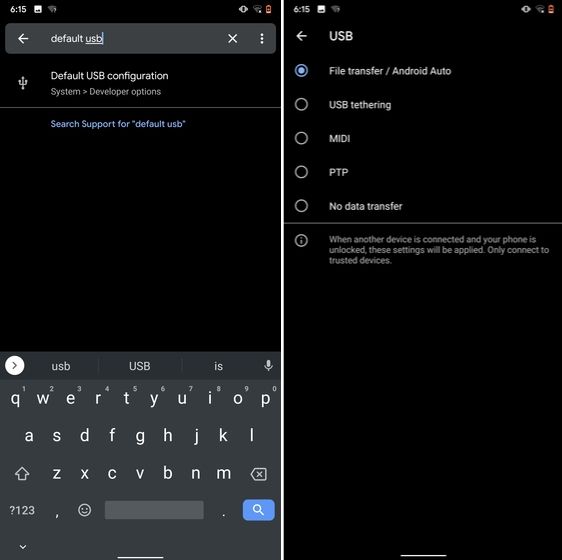
If you are someone who regularly connects Android devices to PC then this sneaky feature is going to help you a lot. Android 10 now allows you to choose your default USB configuration. If you transfer files regularly then simply choose the desired settings and you are good to go. To configure USB, open Settings and search for "Default USB" and tap on the first result. Here, choose "File transfer" or any other settings based on your preference.
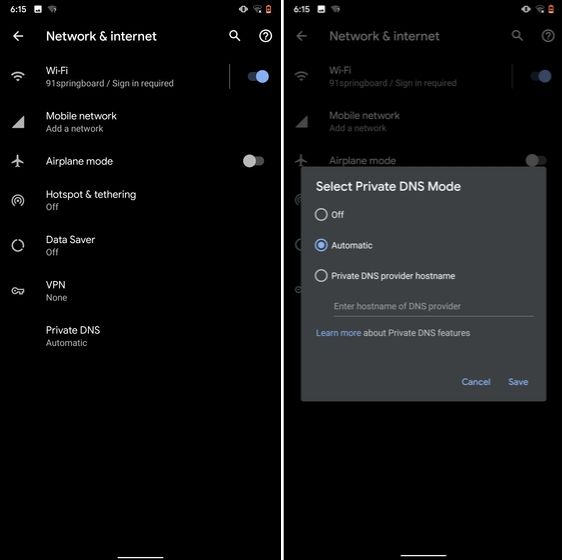
9. Private DNS
While Private DNS was launched with Android Pie, it still remains one of the least talked features of Android. It allows you to encrypt your DNS query so no one can read it, not even your internet service provider. You can find the Private DNS feature in the "Network and Internet" settings page. Here, open "Private DNS" and choose Automatic for Google's DNS or you can also select some other DNS providers as well. I would recommend you to go with Cloudflare's DNS.
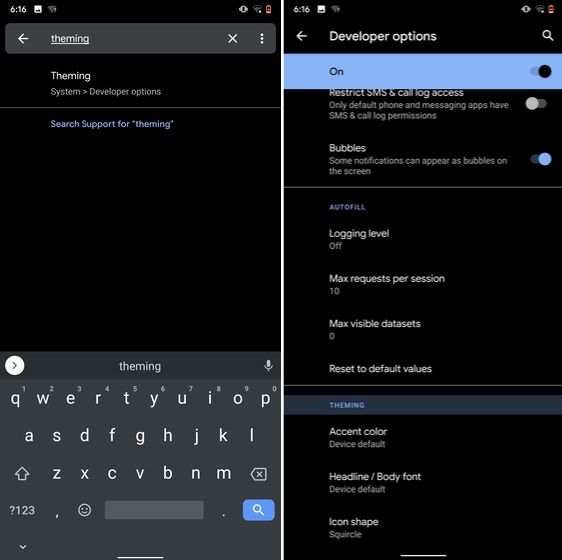
10. Device Theming
Device theming has finally arrived on Android, but it's still hidden under the developer options. You can change the accent color, font and icon shape from a handful of options. To find the desired settings page, open Settings and search for "theming". Tap on the top result and customize your Android device as you prefer.
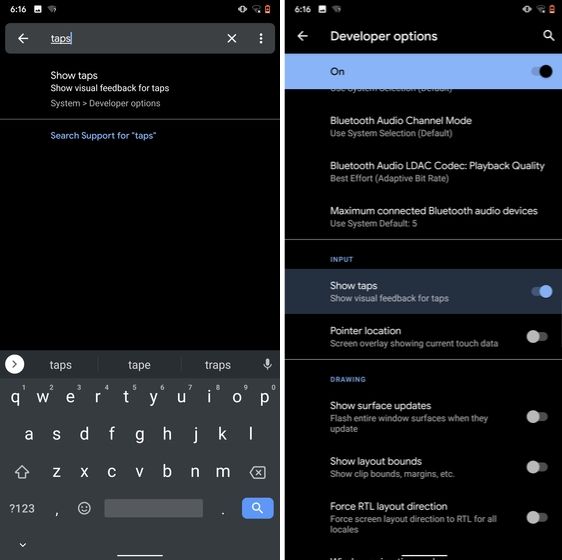
11. Show Taps While Screen Recording
With the release of Android Oreo, Google removed the ability to show taps while screen recording for security reasons. However, the settings to configure taps is still available and hidden under the developer options. Just open the Settings page and search for "taps". Open the first result and enable the toggle. Now, you can record your screen with taps and that's really convenient.
12. Capitalize Words Quickly
If you want to capitalize words quickly then Gboard has this nifty feature which is super helpful and I simply love it. Just select the words and tap the "Shift" button twice to capitalize a chunk of words at once. You can also make it lowercase by similarly double tapping the shift button. And if you just want to keep the initials capital then tap the shift button once. That's pretty great, right? So go ahead and type hassle-free with Gboard.

13. Uninstall Multiple Apps
One of the best hidden Android features is that you can uninstall multiple apps at once. It works on older versions of Android as well so that is great. All you have to do is open the Google Play Store and tap on the hamburger menu and select "My apps and games". Here, switch to the "Installed" section and then tap on "Storage". After that, simply select apps that you want to uninstall and hit that "Free Up" button. Voila, multiple apps just got uninstalled in just one tap.

14. Clear Site Storage Using Chrome
Chrome is notorious for accumulating a large amount of data in background which makes the performance worse and also takes up crucial storage space. If you want to check what websites are eating up your memory space then a hidden Chrome setting can help you with that. Open Chrome on your Android device and head over to its Settings page. Now, navigate to Site Settings and open Storage. Here, you will find all the websites with their storage space. Open any website and tap on the "Delete" icon to finally free up your internal storage from unnecessary cached data.

15. Street View Layer in Google Maps
Street View is an immersive way to explore places and find new landmarks, hotels, restaurants from anywhere around the world. Now, the Street View Layer has been added to Google Maps and it works pretty well. To check if Street View is available in your region, open Google Maps and tap on the "layer" icon on the top-right corner. Now, tap on "Street View" icon and then zoom out to find blue lines on the map. Finally, tap on the blue lines and Street View will show up for that place. That's cool, right? So go ahead and check out Street View to find some hidden gems around the world.

Note: The blue lines show up wherever street view is available.
@EVERYTHING NT
5 Free Online Courses To Learn Artificial Intelligence
Here are the 5 free e-learning courses on Artificial Intelligence
1. UC Berkeley CS188 Intro to AI

- Course Schedule
- Complete sets of Lecture Slides and Videos
- Interface for Electronic Homework Assignments
- Section Handouts
- Specs for the Pacman Projects
- Source files and PDFs of past Berkeley CS188 exams
- Form to apply for edX hosted autograders for homework and projects (and more)
- Contact information
- Machine Learning: CS189, Stat154
- Intro to Data Science: CS194-16
- Probability: EE126, Stat134
- Optimization: EE127
- Cognitive Modeling: CogSci131
- Machine Learning Theory: CS281A, CS281B
- Vision: CS280
- Robotics: CS287
- Natural Language Processing: CS288
2. Artificial Intelligence: Principles and Techniques

3. Learn with GOOGLE AI

4. MIT 6.S094: Deep Learning for Self-Driving Cars

5. Fundamentals of Deep Learning for Computer Vision

- Identify the ingredients required to start a Deep Learning project.
- Train a deep neural network to correctly classify images it has never seen before.
- Deploy deep neural networks into applications.
- Identify techniques for improving the performance of deep learning applications.
- Assess the types of problems that are candidates for deep learning.
- Modify neural networks to change their behavior.
Related word
- Hacking Growth
- Hacking
- Pentest Free
- Pentest Process
- Pentestmonkey Cheat Sheet
- Pentest Plus
- Rapid7 Pentest
- Pentest Ios
- Hacker Ethic
- Pentesting And Ethical Hacking
- Pentest Vpn
- Pentest Methodology
- Hacking The Art Of Exploitation
- Pentest Bootcamp
- Pentest Example Report
- Hacker Anonymous
- Hacking 3Ds
- Hacking Books
- Pentest +
Steghide - A Beginners Tutorial
All of us want our sensitive information to be hidden from people and for that we perform different kinds of things like hide those files or lock them using different softwares. But even though we do that, those files attractive people to itself as an object of security. Today I'm going to give you a slight introduction to what is called as Steganography. Its a practice of hiding an informational file within another file like you might have seen in movies an image has a secret message encoded in it. You can read more about Steganography from Wikipedia.
In this tutorial I'm going to use a tool called steghide, which is a simple to use Steganography tool and I'm running it on my Arch Linux. What I'm going to do is simply encode an image with a text file which contains some kind of information which I don't want other people to see. And at the end I'll show you how to decode that information back. So lets get started:
Requirements:
1. steghide
2. a text file
3. an image file
After you have installed steghide, fire up the terminal and type steghide
It will give you list of options that are available.
Now say I have a file with the name of myblogpassword.txt which contains the login password of my blog and I want to encode that file into an Image file with the name of arch.jpg so that I can hide my sensitive information from the preying eyes of my friends. In order to do that I'll type the following command in my terminal:
steghide embed -ef myblogpassword.txt -cf arch.jpg
here steghide is the name of the program
embed flag is used to specify to steghide that we want to embed one file into another file
-ef option is used to specify to steghide the name (and location, in case if its in some other directory) of the file that we want to embed inside of the another file, in our case its myblogpassword.txt
-cf option is used to specify the name (and location, in case if its in some other directory) of the file in which we want to embed our file, in our case its an image file named arch.jpg
After typing the above command and hitting enter it will prompt for a password. We can specify a password here in order to password protect our file so that when anyone tries to extract our embedded file, they'll have to supply a password in order to extract it. If you don't want to password protect it you can just simply hit enter.
Now myblogpassword.txt file is embedded inside of the image file arch.jpg. You'll see no changes in the image file except for its size. Now we can delete the plain password text file myblogpassword.txt.
In order to extract the embedded file from the cover file, I'll type following command in the terminal:
steghide extract -sf arch.jpg -xf myblogpass.txt
here steghide is again name of the program
extract flag specifies that we want to extract an embedded file from a stego file
-sf option specifies the name of the stego file or in other words the file in which we embedded another file, in our case here its the arch.jpg file
-xf option specifies the name of the file to which we want to write our embedded file, here it is myblogpass.txt
(remember you must specify the name of file with its location if its somewhere else than the current directory)
After typing the above command and hitting enter, it will prompt for a password. Supply the password if any or otherwise just simply hit enter. It will extract the embedded file to the file named myblogpass.txt. Voila! you got your file back but yes the image file still contains the embedded file.
That's it, very easy isn't it?
It was a pretty basic introduction you can look for other things like encrypting the file to be embedded before you embed it into another file and so on... enjoy :)
More articles
Hacktivity 2018 Badge - Quick Start Guide For Beginners
- you are a huge fan of Hacktivity
- you bought this badge around a year ago
- you are just interested in hacker conference badge hacking.
- a computer with USB port and macOS, Linux or Windows. You can use other OS as well, but this guide covers these
- USB mini cable to connect the badge to the computer
- the Hacktivity badge from 2018

Let's get started
Linux
[267300.206966] usb 2-2.2: new full-speed USB device number 14 using uhci_hcd
[267300.326484] usb 2-2.2: New USB device found, idVendor=0403, idProduct=6001
[267300.326486] usb 2-2.2: New USB device strings: Mfr=1, Product=2, SerialNumber=3
[267300.326487] usb 2-2.2: Product: FT232R USB UART
[267300.326488] usb 2-2.2: Manufacturer: FTDI
[267300.326489] usb 2-2.2: SerialNumber: AC01U4XN
[267300.558684] usbcore: registered new interface driver usbserial_generic
[267300.558692] usbserial: USB Serial support registered for generic
[267300.639673] usbcore: registered new interface driver ftdi_sio
[267300.639684] usbserial: USB Serial support registered for FTDI USB Serial Device
[267300.639713] ftdi_sio 2-2.2:1.0: FTDI USB Serial Device converter detected
[267300.639741] usb 2-2.2: Detected FT232RL
[267300.643235] usb 2-2.2: FTDI USB Serial Device converter now attached to ttyUSB0
macOS
# ioreg -p IOUSB -w0 -l
+-o FT232R USB UART@14100000  <class AppleUSBDevice, id 0x100005465, registered, matched, active, busy 0 (712 ms), retain 20>
    |   {
    |     "sessionID" = 71217335583342
    |     "iManufacturer" = 1
    |     "bNumConfigurations" = 1
    |     "idProduct" = 24577
    |     "bcdDevice" = 1536
    |     "Bus Power Available" = 250
    |     "USB Address" = 2
    |     "bMaxPacketSize0" = 8
    |     "iProduct" = 2
    |     "iSerialNumber" = 3
    |     "bDeviceClass" = 0
    |     "Built-In" = No
    |     "locationID" = 336592896
    |     "bDeviceSubClass" = 0
    |     "bcdUSB" = 512
    |     "USB Product Name" = "FT232R USB UART"
    |     "PortNum" = 1
    |     "non-removable" = "no"
    |     "IOCFPlugInTypes" = {"9dc7b780-9ec0-11d4-a54f-000a27052861"="IOUSBFamily.kext/Contents/PlugIns/IOUSBLib.bundle"}
    |     "bDeviceProtocol" = 0
    |     "IOUserClientClass" = "IOUSBDeviceUserClientV2"
    |     "IOPowerManagement" = {"DevicePowerState"=0,"CurrentPowerState"=3,"CapabilityFlags"=65536,"MaxPowerState"=4,"DriverPowerState"=3}
    |     "kUSBCurrentConfiguration" = 1
    |     "Device Speed" = 1
    |     "USB Vendor Name" = "FTDI"
    |     "idVendor" = 1027
    |     "IOGeneralInterest" = "IOCommand is not serializable"
    |     "USB Serial Number" = "AC01U4XN"
    |     "IOClassNameOverride" = "IOUSBDevice"
    |   }
Another way to get this information is
# system_profiler SPUSBDataTypewhich will give back something similar to:
FT232R USB UART:

          Product ID: 0x6001
          Vendor ID: 0x0403  (Future Technology Devices International Limited)
          Version: 6.00
          Serial Number: AC01U4XN
          Speed: Up to 12 Mb/sec
          Manufacturer: FTDI
          Location ID: 0x14100000 / 2
          Current Available (mA): 500
          Current Required (mA): 90
          Extra Operating Current (mA): 0
What you are trying to achieve here is to connect to the device, but in order to connect to it, you have to know where the device in the /dev folder is mapped to. A quick and dirty solution is to list all devices under /dev when the device is disconnected, once when it is connected, and diff the outputs. For example, the following should do the job:
ls -lha /dev/tty* > plugged.txt
ls -lha /dev/tty* > np.txt
vimdiff plugged.txt np.txt
The result should be obvious, /dev/tty.usbserial-AC01U4XN is the new device in case macOS. In the case of Linux, it was /dev/ttyUSB0.
Linux users, read it from here. macOS users, please continue reading
Now you can use either the built-in screen command or minicom to get data out from the badge. Usually, you need three information in order to communicate with a badge. Path on /dev (you already got that), speed in baud, and the async config parameters. Either you can guess the speed or you can Google that for the specific device. Standard baud rates include 110, 300, 600, 1200, 2400, 4800, 9600, 14400, 19200, 38400, 57600, 115200, 128000 and 256000 bits per second. I usually found 1200, 9600 and 115200 a common choice, but that is just me.Regarding the async config parameters, the default is that 8 bits are used, there is no parity bit, and 1 stop bit is used. The short abbreviation for this is 8n1. In the next example, you will use the screen command. By default, it uses 8n1, but it is called cs8 to confuse the beginners.
If you type:
# screen /dev/tty.usbserial-AC01U4XN 9600
or
# screen /dev/ttyUSB0 9600
and wait for minutes and nothing happens, it is because the badge already tried to communicate via the USB port, but no-one was listening there. Disconnect the badge from the computer, connect again, and type the screen command above to connect. If you are quick enough you can see that the amber LED will stop blinking and your screen command is greeted with some interesting information. By quick enough I mean ˜90 seconds, as it takes the device 1.5 minutes to boot the OS and the CTF app.
Windows
You might check the end of the macOS section in case you can't see anything. Timing is everything.
The CTF
Welcome to the Hacktivity 2018 badge challenge!

This challenge consists of several tasks with one or more levels of
difficulty. They are all connected in some way or another to HW RE
and there's no competition, the whole purpose is to learn things.

Note: we recommend turning on local echo in your terminal!
Also, feel free to ask for hints at the Hackcenter!

Choose your destiny below:

  1. Visual HW debugging
  2. Reverse engineering
  3. RF hacking
  4. Crypto protection

Enter the number of the challenge you're interested in and press [
I will not spoil any fun in giving out the challenge solutions here. It is still your task to find solutions for these.
But here is a catch. You can get a root shell on the device. And it is pretty straightforward. Just carefully remove the Omega shield from the badge. Now you see two jumpers; by default, these are connected together as UART1. As seen below.

More info
What Is Cybercrime? What Are The Types Of Cybercrime? What Is Cyberlaw In India?
Cybercrime is the use of computers & networks to perform illegal activities such as spreading viruses,online bullying,performing unauthorized electronic fund transfers etc. Most cyber crimes are committed through the internet.
Some cyber crime also be carried out using mobile phones via Sms and online chatting applications.


